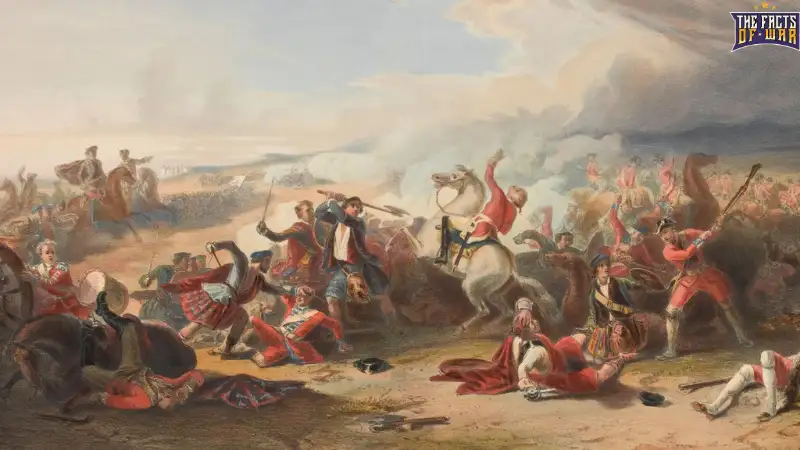
The Battle of Culloden, a defining moment in Scottish history, marked the devastating defeat of the Jacobite rebellion and the end of the Jacobite cause in Great Britain. This clash on Culloden Moor represented the final desperate stand of the Jacobite Army against the Government forces, encapsulating the political suppression of the Stuart restoration efforts and the decline of Highland clan culture. As a historical research expert, I’ll provide a detailed explanatory analysis of this pivotal event in the Jacobite Rising of 1745, incorporating its timeline, battlefield layout, participating clans, and lasting impact on Scottish independence aspirations.
This article explores the 18th-century warfare dynamics, British military strategy against the Highland charge, and the battle’s role as a historical turning point that solidified the House of Hanover’s rule and initiated the end of Jacobitism. From Bonnie Prince Charlie’s campaign to the Duke of Cumberland’s leadership, Culloden’s legacy includes the Act of Proscription and its profound Scottish cultural impact, underscoring civil conflict within the British monarchy’s framework.
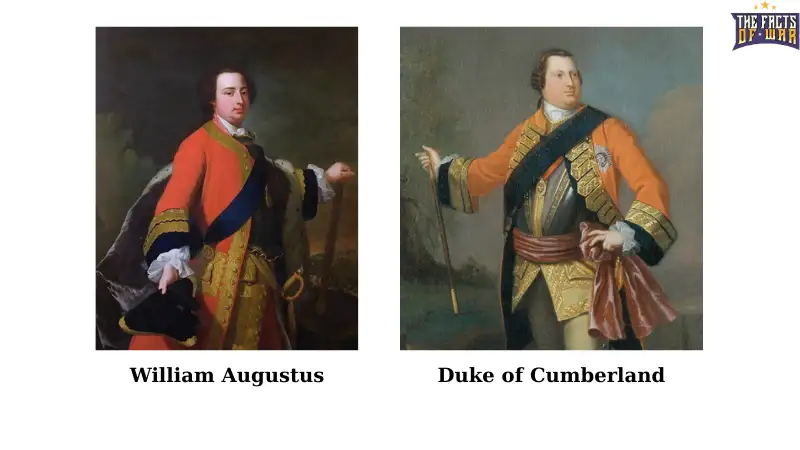
In the broader scope of the Jacobite Rising, the Battle of Culloden was the culmination of the Jacobite uprising 1745, where Highland clans rallied for the Stuart dynasty restoration against Lowland Scots and English forces. Involving Charles Edward Stuart (Bonnie Prince Charlie) leading the Jacobite Army and William Augustus, Duke of Cumberland commanding the British Army, the battle highlighted Jacobite rebellion tactics like the Highland charge against government army tactics of disciplined volley fire. Its aftermath saw British suppression of Highland clan culture, government forces’ victory, and the political suppression that reshaped Scottish Highland history.
The battle’s significance lies in its marking the end of Jacobite cause, with repercussions for Russo-British relations in later centuries through shared monarchical ties, and its portrayal in literature and film as a symbol of Scottish rebellion history.
When Was the Battle of Culloden?
The Battle of Culloden took place on April 16, 1746, during a cold, rainy spring day on Drummossie Moor (commonly known as Culloden Moor) near Inverness in the Scottish Highlands. This one-day engagement was the climactic battle of the Jacobite Rising of 1745, also known as the ’45 Rebellion, which began in July 1745 when Charles Edward Stuart landed in Scotland to restore his father, James Francis Edward Stuart, to the British throne. The rising was part of a series of Jacobite rebellions aimed at overthrowing the House of Hanover and reinstating the House of Stuart, exiled since the Glorious Revolution of 1688.
The battle’s timing was influenced by the Jacobites’ earlier successes, such as the Battle of Prestonpans (September 1745) and Battle of Falkirk Muir (January 1746), which allowed Bonnie Prince Charlie to advance as far as Derby in England before retreating due to lack of support. By April 1746, the Jacobite Army, exhausted and low on supplies after a failed night attack on Cumberland’s camp at Nairn, faced the British Army on unfavorable open terrain.
The date, falling on a Wednesday, saw intermittent sleet and wind that hampered visibility and mobility, particularly for the Highland clans’ charge. Culloden occurred just months before the Act of Proscription in August 1746, which banned Highland dress and weapons, signaling the end of traditional clan warfare.
This period in 18th-century British history reflected broader European dynastic struggles, with France supporting the Jacobites to distract Britain from continental wars. The battle’s swift conclusion lasting less than an hour belied its profound consequences for Scottish independence and the political landscape of Great Britain.
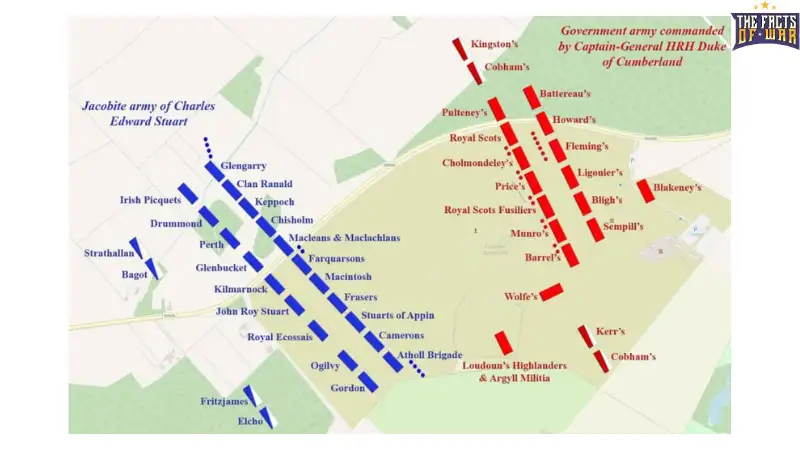
Battle of Culloden Map
A Battle of Culloden map is indispensable for understanding the terrain’s role in the Jacobite defeat and the British victory. Historical maps, such as those from the National Trust for Scotland or Wikipedia, depict Culloden Moor (Drummossie Moor) as a flat, boggy expanse near Inverness, at coordinates 57°28′38″N 4°05′49″W, covering about 1 square mile. The moor, elevated at 200–300 feet, features open ground with some enclosures and marshy areas that hindered movement.
Key elements on typical maps include:
- Geographical Layout: The moor is shown as a treeless plateau, with the Nairn River to the north and Culloden House (Jacobite headquarters) to the east. Leanach Enclosure and the Culwhiniac Enclosure border the field, with boggy ground on the Jacobite right flank.
- Jacobite Positions: Red lines illustrate the Jacobite Army’s front line, about 1,000 yards wide, with clans arrayed in two lines: front under Lord George Murray with Atholl Brigade, Camerons, Stewarts of Appin, Frasers, MacIntoshes (Clan Chattan), MacDonalds, and others; second line as reserves. Artillery (13 guns) positioned in center, cavalry on flanks.
- British Positions: Blue lines depict Cumberland’s three-line formation: front with 16 battalions, artillery (10 three-pounders, 6 mortars) interspersed; reserves including dragoons. The line stretched 900 yards, with enclosures used for enfilade fire.
- Battle Phases: Arrows show the Highland charge from 600 yards, faltering in mud; British volleys decimating ranks. Maps note flanking maneuvers: Government dragoons routing Jacobite right, and reserves mopping up.
- Strategic Features: Shaded bogs highlight terrain impact on charge; Old Leanach Cottage and wells mark post-battle massacre sites. Insets show broader Inverness area, with Fort Augustus and routes from Falkirk.
Maps from Battlefields Trust emphasize the moor’s openness favoring British volley fire over the Highland charge, contributing to Jacobite tactics’ failure. These visualizations, often interactive online, illustrate why Culloden was a mismatch of traditional clan warfare against disciplined government tactics.
Battle of Culloden Clans List: Jacobite Participants
The Battle of Culloden saw numerous Highland clans rally to the Jacobite cause, representing a cross-section of Scottish society united under Bonnie Prince Charlie. Based on historical records, the Jacobite Army included around 5,000–6,000 men from various clans, though not all Highlanders supported the rising—some Lowland Scots and even English Jacobites participated. Here’s a detailed list of major Jacobite clans and units involved, drawn from order of battle sources:
- Clan Cameron: Led by Donald Cameron of Lochiel, ~400–500 men; positioned on the front line’s right, famous for their fierce charge.
- Clan Chattan (Mackintosh, MacGillivray, MacBean): Under Alexander MacGillivray of Dunmaglass, ~350 men; suffered heavy losses in the center.
- Clan Chisholm: Led by Roderick Chisholm, ~200 men; part of the second line.
- Clan Drummond: Including Lord Strathallan’s regiment, ~300 men; reserves.
- Clan Farquharson: Under Charles Farquharson, ~150 men; integrated with Clan Chattan.
- Clan Fraser of Lovat: Led by Charles Fraser of Inverallochy, ~400 men; front line, nearly annihilated.
- Clan Gordon: Led by Lord Lewis Gordon, ~300 men; second line.
- Clan Grant: Small contingent, ~100 men; mixed units.
- Clan MacDonald (Keppoch, Clanranald, Glengarry, Glencoe): Various branches, total ~700 men; left flank, aggrieved by positioning.
- Clan MacGregor: Small group, ~100 men; scattered.
- Clan MacKinnon: ~120 men; front line.
- Clan MacLachlan: ~150 men; with MacLeans.
- Clan MacLaren: Small, ~80 men.
- Clan MacLean: Led by Sir Hector MacLean, ~200 men; front line.
- Clan MacLeod: Limited participation, ~100 men (many MacLeods refused the call).
- Clan MacPherson: Under Cluny MacPherson, ~300 men; arrived late, minimal involvement.
- Clan Menzies: Small, ~50 men.
- Clan Ogilvy: ~200 men; second line.
- Clan Stewart of Appin: Led by Charles Stewart of Ardsheal, ~250 men; front line, heavy losses.
- Atholl Brigade (Murrays, Robertsons): ~500 men; right flank.
Lowland regiments like Ogilvy’s and Lord Elcho’s Life Guards (cavalry, ~200) supplemented, with Irish and French piquets (~300) from the Royal Écossais and Irish Brigade. Total Jacobite strength: ~5,500 infantry, 200 cavalry, 13 guns. Many clans suffered near-total losses, contributing to the post-Culloden cultural suppression. This list underscores the Highland clan culture’s tragic involvement in the Jacobite rebellion.
Summary Battle of Culloden: A Detailed Chronicle of the Clash
The Battle of Culloden summary reveals a mismatched confrontation where traditional Highland tactics met modern British discipline, unfolding in less than an hour but with devastating consequences. This very detailed account draws from eyewitness reports and historical analyses to cover prelude, deployments, phases, and aftermath.
Prelude: The Jacobite Retreat and Fatal Decision (April 15–16, 1746)
After Falkirk’s victory, the Jacobites besieged Fort Augustus but faced supply shortages and desertions. Bonnie Prince Charlie, advised by Lord George Murray, retreated from Derby in December 1745, wintering in Inverness. By April 1746, the army, reduced to 5,000 exhausted men, camped at Culloden House. Cumberland’s 9,000 well-supplied Government forces marched from Nairn, 12 miles east.
On April 15 (Charlie’s birthday), Murray proposed a night march to surprise Cumberland at Nairn. Starting at dusk, the 12-mile trek in darkness and rain faltered; only the vanguard reached by dawn, forcing abortive return. Exhausted Jacobites rested little before battle. Charlie insisted on fighting on the moor, against Murray’s advice for hilly terrain suiting Highland charge. The flat, boggy moor favored British artillery and cavalry.
Deployments: Morning of April 16
At 4 a.m., Jacobites assembled on the moor, facing northeast toward Nairn road. The front line (4,000): Atholl Brigade (left), Camerons, Stewarts of Appin, Frasers, MacIntoshes (Clan Chattan center), Farquharsons, MacLeans/MacLachlans, Chisholms, MacDonalds (right, disgruntled by positioning). Second line (1,000): reserves like Lord John Drummond’s regiment, Irish piquets, and cavalry on flanks. Artillery (13 mixed guns) centered, commanded by inexperienced officers.
Cumberland’s line (8,000): three ranks of infantry, with Barrell’s, Monro’s, and Campbell’s on left; artillery (10 three-pounders, 6 mortars) interspersed for volley fire; dragoons and militia on flanks. The British positioned on higher, drier ground, with enclosures for enfilade.
Sleet blew into Jacobite faces, soaking gunpowder. Charlie positioned at rear, Murray commanding front.
Phase 1: Artillery Exchange and Highland Charge (1:00–1:10 p.m.)
Battle commenced at 1 p.m. with Jacobite guns firing ineffectively (4 rounds), hampered by wet powder and poor aim. British artillery responded with grapeshot, shredding Jacobite ranks, killing dozens per volley. After 10 minutes, MacDonalds hesitated, but right-center clans (Atholl, Camerons, Stewarts) charged spontaneously, followed by center.
The charge, traditional Highland tactic running 300–500 yards with broadswords and targes faltered in boggy ground, taking 30 minutes instead of 1. British volleys (3 rounds per minute) decimated them; clans veered right to avoid marsh, bunching and exposing to enfilade from Wolfe’s regiment in enclosure. Left flank MacDonalds, facing direct fire, halted 100 yards out, firing muskets futilely.
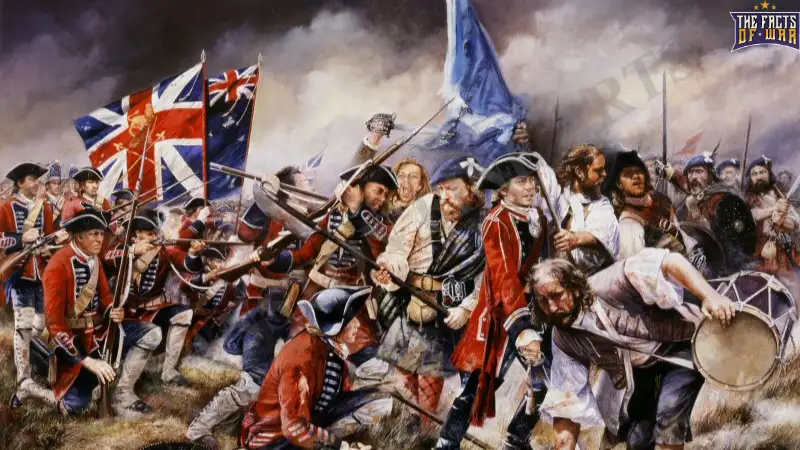
Phase 2: Close Combat and Breakthrough Attempt (1:10–1:20 p.m.)
Reaching British lines, ~700 Jacobites breached Barrell’s and Monro’s regiments, engaging in savage hand-to-hand with bayonets vs. swords. Clan chiefs like Lochiel and MacGillivray fell; Camerons and Stewarts inflicted 50 casualties but were counterattacked by second-line British, bayoneting survivors. Dragoon flanks charged retreating Jacobites, cutting down hundreds.
Charlie’s reserves failed to engage; Irish piquets covered retreat but lost heavily. Murray’s attempts to rally faltered as panic spread.
Aftermath: Rout and Massacre (1:20 p.m. Onward)
The Jacobite line collapsed; survivors fled west toward Inverness, pursued by Cumberland’s cavalry for miles, killing ~1,000 in “the general chase.” Government forces looted and executed wounded, with orders for “no quarter” leading to atrocities. Charlie escaped, evading capture until September, fleeing to France. The battle lasted 40–60 minutes, sealing the Jacobite defeat.
This chronicle highlights Highland charge failure against disciplined fire, terrain’s role, and leadership disparities.
Casualties of the Battle of Culloden
Casualties of the Battle of Culloden were lopsided, reflecting the mismatch. Jacobites suffered 1,500–2,000 killed (300 in battle, 1,200 in pursuit), 222 captured (70 executed), and ~1,000 wounded. Many clans like Frasers and MacDonalds lost 50–80%. British losses: 50 killed, 259 wounded, mostly from the charge’s brief breach. Civilian casualties occurred during pursuit, with villages burned. The high Jacobite toll contributed to the rising’s collapse and Highland depopulation.
Who Won the Battle of Culloden?
The British Army, under William Augustus, Duke of Cumberland, decisively won the Battle of Culloden, crushing the Jacobite Army and effectively ending the Jacobite Rising of 1745. This government victory solidified the House of Hanover’s rule, with Cumberland’s disciplined tactics overwhelming the Highland charge. The Jacobites, led by Charles Edward Stuart and Lord George Murray, suffered a catastrophic defeat, leading to the end of Jacobitism as a viable threat. Cumberland’s “no quarter” orders earned him the nickname “Butcher,” but the win ensured British monarchy’s stability.
Conclusion
The Battle of Culloden remains a poignant symbol of Scottish history’s tragic chapter, where hope for Stuart restoration met brutal reality. From its date on April 16, 1746, to maps of Drummossie Moor, clans like Cameron and MacDonald, this engagement’s detailed summary, heavy casualties, British victory, and conclusion illuminate the rising’s demise. Reflecting on Bonnie Prince Charlie, Duke of Cumberland, George Murray, and sites like Culloden Moor and Fort Augustus, Culloden’s legacy in political suppression and Scottish cultural impact endures. As the end of Jacobitism, it reshaped British history, inspiring reflections on identity and resistance.