The Battle of Bunker Hill stands as one of the most iconic early war battles in the American Revolutionary War, symbolizing colonial resistance and the fierce pursuit of American independence. Fought amid the Siege of Boston, this confrontation highlighted the determination of the Patriot militia against the formidable British Army. Often remembered for its defensive fortifications and intense infantry warfare, the battle showcased military strategy on both sides, from colonial defensive tactics to British military strategy. Despite resulting in a British victory, it provided a significant morale boost to the American forces, embodying American patriotism and the spirit of colonial rebellion.
This article delves into the details of the Bunker Hill battle, exploring its historical significance, key figures like William Prescott and William Howe, and its role in the broader Revolutionary battles.
When Was the Battle of Bunker Hill?
The Battle of Bunker Hill took place on June 17, 1775, marking it as one of the first major engagements following the outbreak of hostilities in the War of Independence. This date is etched in history as a pivotal moment in the 1775 military campaigns, occurring just two months after the Battle of Lexington and Concord, which ignited the conflict in the Massachusetts Bay Colony. The battle unfolded during the summer heat on the Charlestown Peninsula in Charlestown, Massachusetts, as part of the larger Siege of Boston campaign. British occupation of Boston had prompted the colonial forces to act, leading to this clash that would influence the trajectory of the Revolutionary War early battles.
Battle of Bunker Hill Map
Understanding the geography is crucial to grasping the battle tactics employed during the Battle of Bunker Hill. Historical maps of the engagement typically depict the strategic hill positions on the Charlestown Peninsula, with Boston to the south across the water. A typical Battle of Bunker Hill map shows Bunker Hill itself, the higher elevation intended for initial fortification, and the adjacent Breed’s Hill, where most of the fighting actually occurred due to its closer proximity to British positions in Boston.
These maps often illustrate the colonial fortifications, including a central redoubt on Breed’s Hill a square earthen structure about 130 feet on each side and extending breastworks to the east toward the Mystic River to prevent flanking maneuvers. British landing points are marked at Moulton’s Point on the southeast tip of the peninsula, from where Redcoats advanced uphill. Diagrams frequently shade the hills to indicate elevations, with arrows showing the paths of the three British assaults: the first and second repulsed with heavy losses, and the third successful capture. Surrounding features include the Charles River to the west, separating the peninsula from Cambridge, and Charlestown Neck, a narrow isthmus that served as the colonial retreat route under cannon fire.
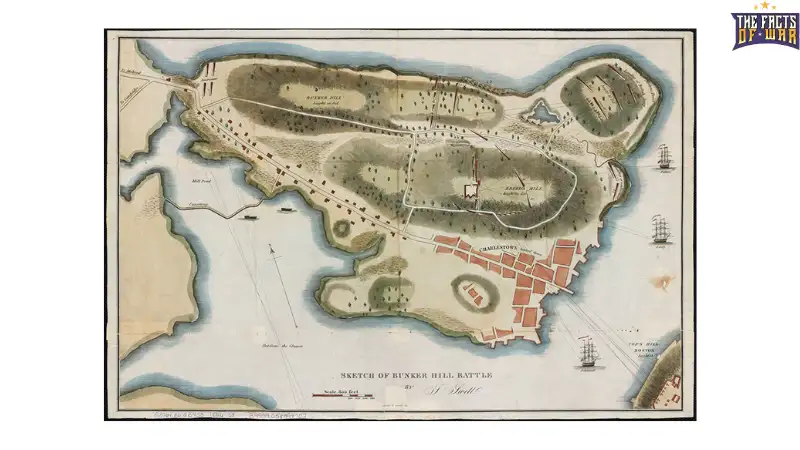
Such maps also highlight artillery positions, like British batteries on Copp’s Hill in Boston and naval guns from ships in the harbor, underscoring the British assault’s multi-faceted approach. For a visual reference, historic sketches from 1775 provide military notes on troop deployments, emphasizing the strategic importance of these locations in the Eastern Theater of the war.
Summary of the Battle of Bunker Hill
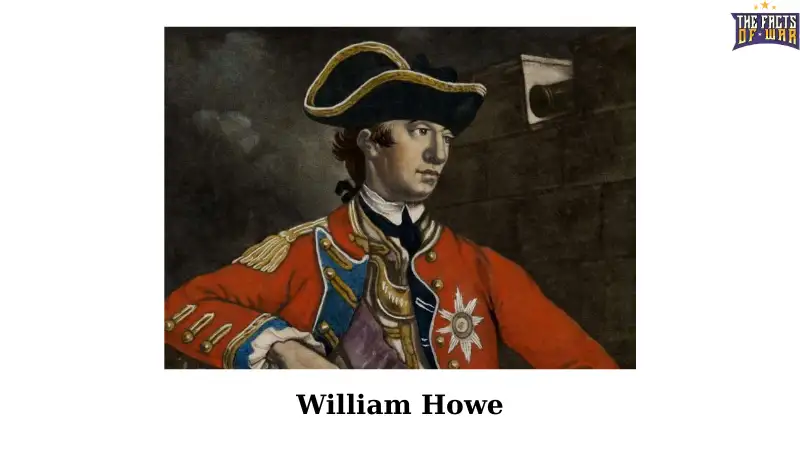
In a nutshell, the Battle of Bunker Hill was a fierce confrontation where approximately 2,400 British troops under General William Howe assaulted colonial positions held by about 1,500 American militia and Continental Army forces led by Colonel William Prescott. The battle stemmed from the British occupation of Boston and the ongoing Siege of Boston, where colonial forces sought to contain the Redcoats. Overnight on June 16, 1775, the colonists fortified Breed’s Hill, prompting a British response the next day.
After two failed assaults marked by devastating colonial fire, the British succeeded on the third try, forcing a colonial retreat. Though a tactical British victory, the high casualties inflicted on the professional British Army by the relatively inexperienced Patriot militia and Minutemen highlighted American military resilience and boosted Patriot morale, proving that colonial resistance could challenge the might of the empire in infantry warfare.
Detailed Battle Summary
Readers seeking in-depth accounts of Revolutionary War battles often focus on the granular details of engagements like the Battle of Bunker Hill, which exemplified the grit of American militia resistance and the challenges of British strategic withdrawal attempts in future campaigns. This detailed battle summary reconstructs the events step by step, drawing on historical records to provide a vivid, explanatory narrative of the Charlestown battle.
The prelude to the battle began in the wake of the Battle of Lexington and Concord on April 19, 1775, which had left Boston under siege by thousands of colonial militiamen from across New England. General Thomas Gage, the British commander in chief, faced mounting pressure with his forces bottled up in the city, reliant on naval supplies amid growing colonial fortifications around the perimeter. By mid-June, British intelligence revealed plans to reinforce the Dorchester Heights south of Boston, prompting Gage to order the occupation of the Charlestown Peninsula’s hills to secure the northern flank. However, colonial leaders, including the Massachusetts Committee of Safety, preempted this by deciding on June 15 to fortify Bunker Hill and Breed’s Hill themselves.
Under the cover of darkness on June 16, 1775, Colonel William Prescott led about 1,200 men primarily from Massachusetts regiments, including Minutemen and elements of what would become the Continental Army across Charlestown Neck to the peninsula. Israel Putnam, a veteran of the French and Indian War, oversaw the operation, emphasizing the need for defensive fortifications. Initially tasked with Bunker Hill, the higher and more defensible position, Prescott’s forces opted for Breed’s Hill instead, as it offered better command over Boston Harbor and potential artillery range on the city itself. This decision, while tactically aggressive, exposed them to closer British observation and fire.
Working through the night with picks and shovels, the colonists constructed a redoubt on Breed’s Hill: a sturdy earthen fort about 6 feet high with wooden platforms for muskets. By dawn on June 17, they had also begun a breastwork extending downhill to the east, protecting against flanking. The noise of construction alerted British sentries, and at around 4 a.m., HMS Lively opened fire from the harbor, soon joined by other ships like HMS Somerset and batteries from Copp’s Hill in Boston. The barrage set Charlestown ablaze later in the day but had minimal initial impact on the entrenched colonists, who continued their work under sporadic cannonade.
As morning broke, British commanders Gage, Howe, Henry Clinton, and John Burgoyne convened aboard HMS Somerset to assess the situation. Howe, appointed to lead the assault, advocated for a landing at Moulton’s Point to outflank the colonial left, rather than a direct frontal attack. By noon, preparations were underway: 1,500 troops ferried across in longboats, landing unopposed around 1:30 p.m. amid light colonial skirmishing. Reinforcements brought the British total to about 2,400, including elite units like grenadiers and light infantry, supported by Hessian troops in later contexts but primarily Redcoats here.
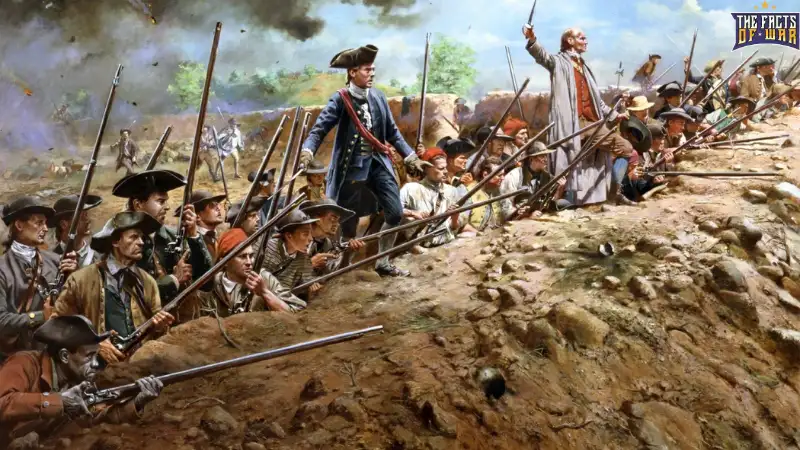
On the colonial side, reinforcements trickled in. General Israel Putnam rallied more men, while Major General Joseph Warren, a prominent Patriot leader, joined as a volunteer despite his civilian status, boosting morale. Seth Pomeroy and other officers helped organize the lines, which now included about 1,500 defenders spread across the redoubt, breastworks, and a rail fence fortified with hay to the southeast. Prescott famously instructed his men: “Do not fire until you see the whites of their eyes,” conserving ammunition for maximum effect in this era of musket warfare.
The first British assault commenced around 3 p.m. Howe divided his forces: Brigadier General Robert Pigot targeted the redoubt directly up the hill, while Howe himself led the main column against the colonial left at the rail fence, aiming to envelop. Marching in disciplined lines, the Redcoats advanced under withering colonial musketry and grape shot from a few artillery pieces. The colonists, sheltered by their colonial fortifications, unleashed volley after volley, mowing down ranks of advancing soldiers.
Pigot’s men faltered under the fire, and Howe’s flank attack bogged down in swampy terrain and fences. After 15-20 minutes, the British retreated in disarray, leaving hundreds dead or wounded on the slopes. Casualties in this wave alone were staggering, with officers like Lieutenant Colonel James Abercrombie mortally wounded.

Undeterred, Howe regrouped for a second assault about 30 minutes later. This time, the British shed heavy packs to move faster, but the pattern repeated. Colonial fire from the redoubt and breastworks decimated the lines, with Minutemen and militia proving their mettle in American militia resistance. The assault collapsed again, with even more losses, as the colonists held firm under William Prescott’s leadership. Ammunition began to dwindle, however, and confusion arose as some units hesitated to reinforce due to the perilous Charlestown Neck, exposed to British cannon.
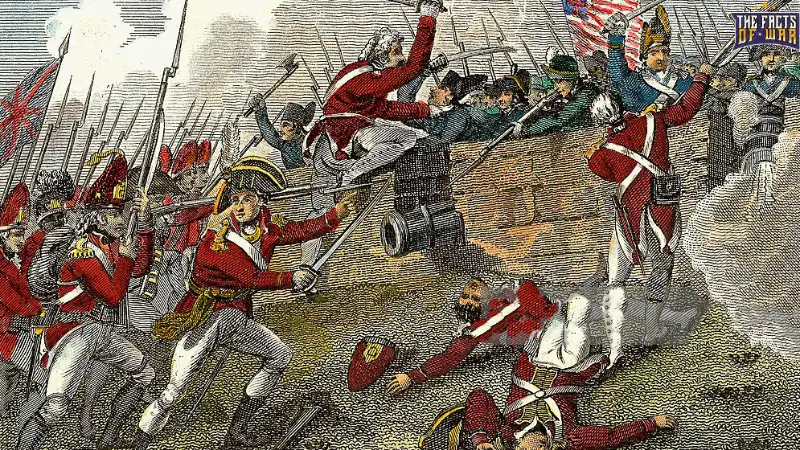
By late afternoon, around 4:30 p.m., Howe launched the third and final assault. Learning from prior failures, he concentrated forces in deeper columns for a bayonet charge, focusing on the redoubt while feinting elsewhere. Colonial powder was nearly exhausted; many defenders resorted to clubbing muskets or throwing stones. As British grenadiers breached the walls, hand-to-hand combat ensued. Major John Pitcairn, famed from Lexington, fell mortally wounded. Joseph Warren’s sacrifice came here—he was shot in the head while covering the retreat, becoming a martyr for the cause. Prescott ordered a withdrawal, and the colonists fell back over Bunker Hill to Cambridge, harassed by cannon fire on the Neck, where Andrew McClary was killed, the last colonial casualty.
By 5 p.m., the British controlled the peninsula, but at a tremendous cost. The Redcoat advance had secured the strategic hill, yet the battle’s intensity foreshadowed the protracted nature of the conflict, with artillery in Revolutionary War playing a supportive but not decisive role here.
This exhaustive recounting reveals the battle’s tactical draw elements despite the outcome highlighting Breed’s Hill defense as a testament to Patriot military efforts and the American Revolutionary strategy of attrition.
Casualties of the Battle of Bunker Hill
The casualties of the Battle of Bunker Hill underscored its brutality and the asymmetry in losses. Colonial forces suffered approximately 450 casualties in total, including 140 killed and 310 wounded or missing. Notable among the dead was Joseph Warren, whose loss was a blow to colonial leadership. Only about 30 were captured, many succumbing later in British custody. In contrast, the British Army endured 1,054 casualties: 226 killed and 828 wounded, representing over 40% of their engaged force. This included 92 officers, a disproportionate hit to command structure. The high British toll, inflicted largely during the uphill assaults, amplified the battle’s reputation as a costly endeavor in infantry warfare.
Who Won the Battle of Bunker Hill?
Determining who won the Battle of Bunker Hill depends on perspective. Tactically, it was a British victory; under William Howe, the Redcoats captured the Charlestown Peninsula and Breed’s Hill, achieving their objective of dislodging the colonial forces. However, this came at such a high price that it is often termed a Pyrrhic victory, as noted by General Henry Clinton, who remarked it was “too dearly bought.” The battle discouraged aggressive British pursuits and bolstered the Continental Army’s confidence, proving that American militia could inflict severe damage on professional troops.
Battle of Bunker Hill Significance
The Battle of Bunker Hill’s significance reverberates through American history, marking it as a cornerstone of Revolutionary War significance. As the first major battle of the conflict, it confirmed that reconciliation between Britain and the colonies was impossible, escalating the push for American independence. Despite the tactical stalemate lean toward British control, the engagement provided a profound morale boost to the Patriots, demonstrating American resilience and the viability of colonial defensive tactics against superior numbers.
It predicted the character of the rest of the war, showing that inexperienced militia, including Minutemen, could stand against the world’s premier army, influencing British caution in subsequent campaigns like the Monmouth campaign parallels later on. The battle inspired diverse groups, from abolitionists to suffragists, symbolizing the fight for liberties. Participation by figures like Peter Salem, an African American soldier, highlighted inclusive American Revolutionary spirit. For the British, it introduced years of frustration, as generals like Howe faced the realities of protracted warfare. Ultimately, it galvanized support for the Continental Army’s formation and underscored the Battle of Bunker Hill legacy as a turning point in colonial rebellion.
Conclusion
In retrospect, the Battle of Bunker Hill encapsulates the essence of the American Revolutionary War: a struggle where determination and strategic pursuit outweighed numerical superiority. From the heroic stands on Breed’s Hill to the sobering British retreat implications for future battles, this engagement fostered American patriotism and set the stage for the long fight ahead. Its historical significance endures, reminding us of the sacrifices in the quest for independence and the enduring Revolutionary War legacy. As one of the defining New Jersey battles’ precursors in spirit if not location the battle remains a beacon of colonial resistance and military leadership.